Azure Arc

Azure Arc & Automanage for MAAS

In a previous blog, MAAS (Metal-as-a-Service) Full HA Installation — Crying Cloud we deployed MAAS controllers to manage on-premise hardware. Let’s explore using the Azure platform to see what we can do with Azure Arc and Azure Automanage to monitor and keep our Metal-as-a-Service infrastructure systems operational.

From Azure Arc, we want to generate an onboarding script for multiple servers using a Service principal Connect hybrid machines to Azure at scale - Azure Arc | Microsoft Docs for Linux servers. We can now run the script on each of the Ubuntu MAAS controller

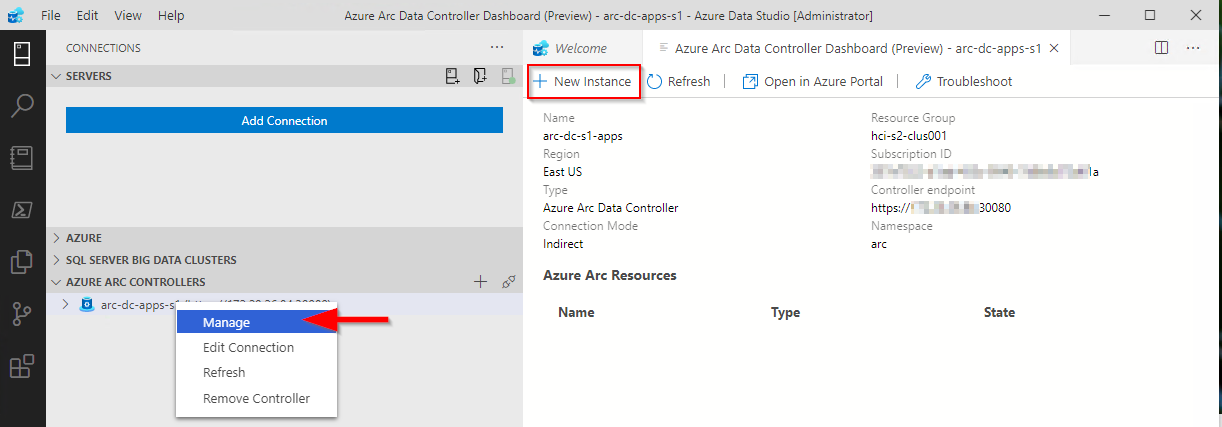
We now have an Azure Resource that represents our on-premise Linux server.

At the time of writing this if I use the ‘Automanage’ blade and try to use the built-in or Customer Automanage profile an error is displayed “Validation failed due to error, please try again and file a support case: TypeError: Cannot read properties of undefined (reading 'check')”

Try as I might, I could not get past this error. However, by going to each individual Arc server resource we can enable ‘Azure best practices - Dev / Test’ individually.

At the time of trying this Automanage is still in preview and I could not create and add a custom policy. For we can move ahead with the ‘Dev / Test’ policy which still validates the Azure services we want to enable.

Using the blade we can still see the summary activity using the ‘Automanage’ blade

I was exploring some configuration settings with the older agents and the Automanage and looks like some leftover configuration issues persist.

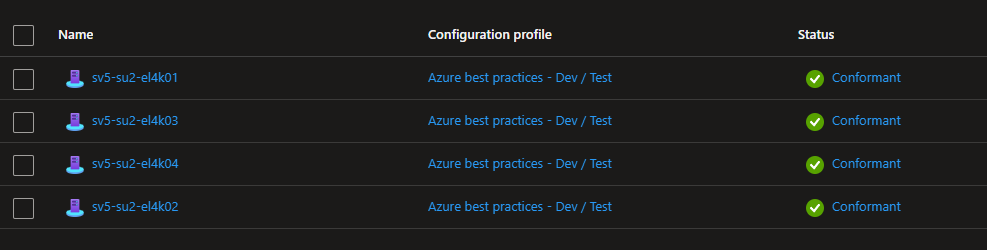
After removing the OMSForLinuxAgent and reinstalling the Arc Connected agent all servers showed as Conformant

As we build out lab more of the infrastructure we will continue to explore the uses of Azure Arc and Azure Automanage

MAAS (Metal-as-a-Service) Full HA Installation

This was the process I used for installing MAAS in an HA configuration. Your installation journey may vary, based on configuration choices. This was written to share my experience beyond using MAAS in the single instance Test/POC configuration

Components & Versions

  • Ubuntu 20.04.4 LTS (Focal Fossa)

  • Postgres SQL 14.5 (streaming replication)

  • MAAS 3.2.2 (via snaps)

  • HA Proxy 2.6.2

  • Glass 1.0.0

Server Configuration (for reference in configuration settings)

2x Region/API controllers, 2x Rack controllers, 2x General Servers

  • SV5-SU1-BC2-01 [Primary DB / Region Controller / HA Proxy]

  • SV5-SU1-BC2-02 [Secondary DB / Region Controller / HA Proxy]

  • SV5-SU1-BC2-03 [Rack Controller / Glass]

  • SV5-SU1-BC2-04 [Rack Controller]

  • SV5-SU1-BC2-05 [General Server]

  • SV5-SU1-BC2-06 [General Server]

Prerequisites

  • Servers deployed with Static IPs

  • Internet Access

  • limited Linux/Ubuntu experience helpful

  • VIM editor knowledge (or other Linux text editor)


Primary Postgres SQL Install

First we need to install Postgres SQL. I am using streaming replication to ensure there is a copy of the database. you may select a different method for protecting your database.

# INSTALL PRIMARY POSTGRES SQL
# Run on SV5-SU1-BC2-01 (Primary DB) 
sudo apt update && sudo apt upgrade
sudo apt -y install gnupg2 wget vim bat
sudo apt-cache search postgresql | grep postgresql
sudo sh -c 'echo "deb http://apt.postgresql.org/pub/repos/apt $(lsb_release -cs)-pgdg main" > /etc/apt/sources.list.d/pgdg.list'
wget --quiet -O - https://www.postgresql.org/media/keys/ACCC4CF8.asc | sudo apt-key add -
sudo apt -y update
sudo apt -y install postgresql-14
systemctl status postgresql
sudo -u postgres psql -c "SELECT version();"
sudo -u postgres psql -c "SHOW data_directory;"

# CREATE USERS AND DATABASE FOR MAAS
# Run on SV5-SU1-BC2-01 (Primary DB) only 

export MAASDB=maasdb
export MAASDBUSER=maas
# WARNING you have to escape special characters for the password
export MAASDBUSERPASSWORD=secret

sudo -u postgres psql -c "CREATE USER \"$MAASDBUSER\" WITH ENCRYPTED PASSWORD '$MAASDBUSERPASSWORD'"
sudo -u postgres createdb -O $MAASDBUSER $MAASDB

# Check user and database via query
sudo -u postgres psql
# List databases
\l
# list users
\du
# drop DB
#DROP DATABASE <DBNAME>;
# quit 
\q

# POSTGRESSQL LISTEN ADDRESS
sudo vi /etc/postgresql/14/main/postgresql.conf
# search for listen_addresses ='localhost' uncomment and edit  listen_addresses ='*' save and quit

# ALLOW DATA ACCESS
sudo vi /etc/postgresql/14/main/pg_hba.conf
#add lines 
# host    maasdb          maasdbuser      172.30.0.0/16           md5
# host    replication     maasdbrep       172.30.0.0/16           md5

# CHECK LOG FOR ERROR
tail -f /var/log/postgresql/postgresql-14-main.log

# Additional Commands 
# PostgresSQL restart Command
# sudo systemctl restart postgresql
# Uninstall PostgresSQL
# sudo apt-get --purge remove postgresql postgresql-*

Configure Postgres SQL Streaming Replication

# INSTALL SECONDARY POSTGRES SQL
# RUN on SV5-SU1-BC2-02 (Secondary DB)
sudo apt update && sudo apt upgrade
sudo apt -y install gnupg2 wget vim bat
sudo apt-cache search postgresql | grep postgresql
sudo sh -c 'echo "deb http://apt.postgresql.org/pub/repos/apt $(lsb_release -cs)-pgdg main" > /etc/apt/sources.list.d/pgdg.list'
wget --quiet -O - https://www.postgresql.org/media/keys/ACCC4CF8.asc | sudo apt-key add -
sudo apt -y update
sudo apt -y install postgresql-14
systemctl status postgresql
sudo -u postgres psql -c "SELECT version();"
sudo -u postgres psql -c "SHOW data_directory;"

# RUN on SV5-SU1-BC2-01 (Primary DB)
# CREATE REPLICATION USER
export MAASREPUSER=maasdbrep
export MAASREPASSWORD=secret
sudo -u postgres psql -c "CREATE USER \"$MAASREPUSER\" WITH REPLICATION ENCRYPTED PASSWORD '$MAASREPASSWORD'"

# CREATE REPLICATION SLOT
# RUN on SV5-SU1-BC2-01 (Primary DB)
sudo -u postgres psql
select * from pg_create_physical_replication_slot('maasdb_repl_slot');
select slot_name, slot_type, active, wal_status from pg_replication_slots;

# CONFIGURE REPLICATION
# RUN on SV5-SU1-BC2-02 (Secondary DB)
sudo systemctl stop postgresql
sudo -u postgres rm -rf /var/lib/postgresql/14/main/*
sudo -u postgres pg_basebackup -D /var/lib/postgresql/14/main/ -h 172.30.9.66 -X stream -c fast -U maasdbrep -W -R -P -v -S maasdb_repl_slot
# enter password for maasdbrep user
sudo systemctl start postgresql

# CHECK LOG FOR ERROR
tail -f /var/log/postgresql/postgresql-14-main.log

# CHECK REPLICATION
# RUN on SV5-SU1-BC2-01 (Primary DB)
sudo -u postgres psql -c "select * from pg_stat_replication;"

MAAS Installation Region Controllers

# All Hosts
sudo snap install --channel=3.2 maas

# INITIATE FIRST CONTROLLER 
# Run on SV5-SU1-BC2-01
sudo maas init region --database-uri "postgres://maas:secret@SV5-SU1-BC2-01/maasdb" |& tee mass_initdb_output.txt
## use default MAAS URL, Capture MAAS_URL 

# INITIATE SECOND CONTROLLER
# Run on SV5-SU1-BC2-02
sudo maas init region --database-uri "postgres://maas:secret@sv5-su1-bc2-01/maasdb" |& tee mass_initdb_output.txt

# Capture MAAS_SECRET for additional roles
sudo cat /var/snap/maas/common/maas/secret

# CREATE ADMIN
# follow prompts, can import SSH keys via lanuchpad user
sudo maas createadmin

Install Rack Controllers

# INSTALL RACK CONTROLLERS
# run on SV5-SU1-BC2-03 & SV5-SU1-BC2-04 
sudo maas init rack --maas-url $MAAS_URL --secret $MAAS_SECRET

# CHECK MAAS SERVICES
sudo maas status

# CONFIGURE SECONDARY API IP ADDRESS
sudo vi /var/snap/maas/current/rackd.conf

# Update contents of file to include both API URLs
maas_url:
   - http://172.30.9.66:5240/MAAS
   - http://172.30.9.57:5240/MAAS

Install HA Proxy for Region / API Controllers

# INSTALL HAPROXY BINARIES
# run on SV5-SU1-BC2-01 and SV5-SU1-BC2-02
sudo add-apt-repository ppa:vbernat/haproxy-2.6 --yes
sudo apt update
sudo apt-cache policy haproxy
sudo apt install haproxy -y
sudo systemctl restart haproxy
sudo systemctl status haproxy
haproxy -v

# CONFIGURE HA PROXY
sudo vi /etc/haproxy/haproxy.cfg
# update this content
        timeout connect 90000
        timeout client  90000
        timeout server  90000
# insert this content at the end of the file
frontend maas
    bind    *:80
    retries 3
    option  redispatch
    option  http-server-close
    default_backend maas

backend maas
    timeout server 90s
    balance source
    hash-type consistent
    server maas-api-1 172.30.9.66:5240 check
    server maas-api-2 172.30.9.57:5240 check

sudo systemctl restart haproxy

Add A Host records to DNS

Browse MAAS via DNS name

Enable VLAN DHCP

First going to Subnets to look for the secondary network

You need to add at least a dynamic range. You may6 want to include a general reserved range

Now we can add the DHCP server to the Fabric, select the VLAN containing your subnet

Provide DHCP, you can now select primary and secondary rack controllers and click configure DHCP


Commission the First Server

Find a server you can PXE boot to test DHCP configuration

As long as the server can communicate on the network, you will see the it grab an IP address from the dynamic range we specified

the ubuntu image will be loaded and Maas will start enlisting the server into its database

back in the console we can see the server has been given a random name and is commissioning

The server has been enlisted and is now listed as ‘New’

We can commission the server to bring it under Maas Control

there are additional options you can select and other tests you can execute, see Maas.io for more information

You can test your hardware, Disks, memory, and CPU for potential issues

you can edit the servers name and check out the commissioning, tests, and logs sections while the servers is being comissioned

Eventually, you will see the server status as ready. We have a new name for this server and we can see the ‘Commissioning’ and ‘Tests’ were all successful.

here are two commissioned servers in MAAS ‘Ready’ for deployment in this test environment

for a larger example I can show you in our lab environment we have 195 servers under Maas’s control with 48 dynamic tags to help organize and manage our hardware


Creating Server Tags

It can be easier to organize servers by using tags based on hardware types. Let’s create 3 tags, to identify the hardware vendor, server model, and CPU model.

Select ‘Logs’ and ‘Download’ and select ‘Machine Output (XML) to download XML server file

here you can browse through the file so you can find the content you need to create your regex match. You will need to understand how to create regex search. There are examples and websites that can help with this.

Return to ‘Machines’ and select ‘Tags’

select ‘Create New Tag’

//node[@class="system"]/product = "ProLiant BL460c Gen8 (745916-S01)"
//node[@class="system"]/vendor = "HP"
//node[@id="cpu:0"]/product = "Intel(R) Xeon(R) CPU E5-2690 v2 @ 3.00GHz"

you can view the dynamic tags associated with your first commissioned server


Deploying Images

first lets download an additional ubuntu image the latest LTS image 22.04

The image will download and sync with the rack controllers

before deploying this image let’s make sure we have an SSH key imported. I have created these using PuTTYgen. I will not cover creating or uploading these keys here, see existing documentation. In the Lab environment, it includes my administration key and a common key shared with other admins.

Select ‘Machines’, select ‘Ready

we can no


DHCP Long Lease

You may want to consider extending the DHCP lease time for subnets by using snippets. We are using DHCP for OOB management and extending the lease time brings additional continuity to network devices while attempting to reduce configuration complexity


Add Listen Statistics to HA Proxy

# CONFIGURE HA PROXY
sudo vi /etc/haproxy/haproxy.cfg
# insert this content at the end of the file
listen stats
        bind localhost:81
        stats enable                    # enable statistics reports
        stats hide-version              # Hide the version of HAProxy
        stats refresh 30s               # HAProxy refresh time
        stats show-node                 # Shows the hostname of the node
        stats uri /                # Statistics URL

sudo systemctl restart haproxy

Browse to common DNS address and statistics port


Install Glass (DHCP Monitoring)

# INSTALL GLASS
sudo apt-get install -y nodejs
nodejs -v

cd /opt
sudo git clone https://github.com/Akkadius/glass-isc-dhcp.git
cd glass-isc-dhcp
sudo mkdir logs
sudo chmod u+x ./bin/ -R
sudo chmod u+x *.sh

sudo apt install npm -y

sudo npm install
sudo npm install forever -g
sudo npm start

# CONFIGURE GLASS
sudo vi /opt/glass-isc-dhcp/config/glass_config.json

"leases_file": "/var/snap/maas/common/maas/dhcp/dhcpd.leases",
"log_file": "/var/snap/maas/common/log/dhcpd.log",
"config_file": "/var/snap/maas/common/maas/dhcpd.conf",

# START GLASS
sudo npm start

browse to the name or IP of the server on port 3000 and you can see the interface.

this content from the main Lab system with more data

you can use this interface to search for data such as mac address or IP address and look at start and end lease data

There are more details about how to configure this solution in the GitHub project itself


Access command line API

Sometimes you just want to get data from the command line. Maas has a number of operations it can do from the command line. It this example we are going to retrieve the MAAS user password for the iLO

you will need to get your API key, found under your username and ‘API Keys’ select copy

SSH into one of your MAAS hosts run the command

maas login <username> <apiurl> <apikey>

the maas.io documentation contains more information about API commands MAAS | API. Running maas <username> will show you the commands

let’s see what the machine operation can do

there is a power-parameters operator and the machine operation requires a system_id. To keep this example simple we are going to grab the machine code from the browser but you could get this information from the command line

if we put all this together we can now run a command and extract the iLO password from the MAAS database via the API on the commandline


Troubleshooting IPMI - IPMI tools

MAAS does a pretty amazing job of grabbing any hardware, controlling the iLO/BMC/Drac/OOB management port and creating a user for it to boot and control the server hardware. If you browse to your machine and select configuration you can see the power configuration section.

This contains the settings MAAS is using to control that hardware.

On the rare occasion, you run into trouble, firstly make sure your firmware is up to date. I installed IPMI tools which can be helpful for testing or troubleshooting IPMI operations manually. We can use the details collected in the previous step to execute the query

# INSTALL IPMPTOOL
# Run on SV5-SU1-BC2-03 and SV5-SU1-BC2-04 where IPMI operations take place
sudo apt install ipmitool -y

ipmitool -I lanplus -H 172.20.10.177 -U maas -P 8in0zOE1Lxx -L OPERATOR power status

Running PowerShell Query on API output

And now a favorite topic of mine… PowerShell. Now imagine you could control MAAS through your very own PowerShell queries… I know right?!?

# INSTALL POWERSHELL
# Update the list of packages
sudo apt-get update
# Install pre-requisite packages.
sudo apt-get install -y wget apt-transport-https software-properties-common
# Download the Microsoft repository GPG keys
wget -q "https://packages.microsoft.com/config/ubuntu/$(lsb_release -rs)/packages-microsoft-prod.deb"
# Register the Microsoft repository GPG keys
sudo dpkg -i packages-microsoft-prod.deb
# Update the list of packages after we added packages.microsoft.com
sudo apt-get update
# Install PowerShell
sudo apt-get install -y powershell
# Start PowerShell
pwsh

# SIMPLE EXAMPLE QUERY
maas maasadmin machines read | convertfrom-json
maas maasadmin machines read | convertfrom-json | select resource_uri

What else is possible? Let’s say you have blade chassis and through the power of centralized management, you PXE boot all blades at once. MAAS will register hundreds of hosts.

Do you want to match the serial number of the blade slot to the chassis number?

Thanks, but that would be a hard no from me

how about some PowerShell?

Absolutely!

# SCRIPT TO SET MACHINE NAME
# Find the serial number of each Chassis and define prefix
$scaleunit = @{ '8Z35xxx' = 'SV5-SU3-BC1';'8Z56xxx' = 'SV5-SU3-BC2';'11N7xxx' = 'SV5-SU3-BC3';'G7S6xxx' = 'SV5-SU3-BC4';'DBR6xxx' = 'SV5-SU3-BC5'}

# Read machines into a variable
$machines = maas maasadmin machines read | ConvertFrom-Json

# process variables and set hostname
foreach ($machine in $machines){
    $chassis = ($machine.hardware_info.chassis_type)
    #Grab info for M1000e blades
    if ($chassis -eq "Multi-system chassis") {
        # Find blade slot
        $slot = ($machine.hardware_info.mainboard_serial).split(".")[3]
        $chassisid = ($machine.hardware_info.chassis_serial)
        $suname = $scaleunit.$chassisid
        $newname = "$suname-$slot"
        write-host $newname
        if ($newname -ne $machine.hostname) {
            maas maasadmin machine update $machine.system_id hostname=$newname
        }
    }
    else {}
}

This is just one example of how you can leverage MAAS data. You could use it to update your CMBD. In this screenshot below, we are using Sunbirds DC track to manage hardware and have created a custom field that is dynamically created and will link you directly to MAAS to find that specific server.

Hands on with Azure Arc enabled data services on AKS HCI - part 2

This is part 2 in a series of articles on my experiences of deploying Azure Arc enabled data services on Azure Stack HCI AKS.

  • Part 1 discusses installation of the tools required to deploy and manage the data controller.

  • Part 2 describes how to deploy and manage a PostgreSQL hyperscale instance.

  • Part 3 describes how we can monitor our instances from Azure.

First things first, the PostgreSQL extension needs to be installed within Azure Data Studio. You do this from the Extension pane. Just search for ‘PostgreSQL’ and install, as highlighted in the screen shot below.

1.postgresExt.png

I found that with the latest version of the extension (0.2.7 at time of writing) threw an error. The issue lies with the OSS DB Tools Service that gets deployed with the extension, and you can see the error from the message displayed below.

2.postgresExtErr.png

After doing a bit of troubleshooting, I figured out that VCRUNTIME140.DLL was missing from my system. Well, actually, the extension does have a copy of it, but it’s not a part of the PATH, so can’t be used. Until a new version of the extension resolves this issue, there are 2 options you can take to workaround this.

  1. Install the Visual C++ 2015 Redistributable to your system (Preferred!)

  2. Copy VCRUNTIME140.DLL to %SYSTEMROOT% (Most hacky; do this at own risk!)

    You can find a copy of the DLL in the extension directory:

%USERPROFILE%\.azuredatastudio\extensions\microsoft.azuredatastudio-postgresql-0.2.7\out\ossdbtoolsservice\Windows\v1.5.0\pgsqltoolsservice\lib\_pydevd_bundle
3.vcruntime140.dll.png

Make sure to restart Azure Data Studio and check that the problem is resolved by checking the output from the ossdbToolsService. The warning message doesn’t seem to impair the functionality of the extension, so I ignored it.

Now we’re ready to deploy a PostgreSQL cluster. Within ADS, we have two ways to do this.

1. Via the data controller management console:

5.newinstance1.png

2. From the Connection ‘New Deployment…’ option. Click on the ellipsis () to present the option.

Whichever option you choose, the next screen that is presented are similar to one another. The example I‘ve shown is via the ‘New Connection’ path and shows more deployment types. Installing via the data controller dashboard, the list is filtered to what can be deployed to the cluster (the Azure Arc options).

Select PostgreSQL Hyperscale server groups - Azure Arc (preview), make sure that the T&C’s acceptance is checked and then click on Select.

The next pane that’s displayed is where we defined the parameters for the PostgreSQL instance. I’ve highlighted the options you must fill in as a minimum. In the example, I’ve set the number of workers to 3. By default it is set to 0. If you leave it as the default, a single worker is deployed.

Note: If you’re deploying more than one instance to your data controller. make sure to seta unique Port for each server group. The default is 5432

Clicking on Deploy runs through the generated Jupyter notebook.

After a short period (minutes), you should see it has successfully deployed.

After a short period (minutes), you should see it has successfully deployed.

ADS doesn’t automatically refresh the data controller instance, so you have to manually do this.

Once refreshed, you will see the instance you have deployed. Right click and select Manage to open the instance management pane.

As you can see, it looks and feels similar to the Azure portal.

If you click on the Kibana or Grafana dashboard links, you can see the logs and performance metrics for the instance.

Note: The Username and password are are what you have set for the data controller, it is not the password you set for the PostgreSQL instance.

Example Kibana logs

Example Kibana logs

Grafana Dashboard

Grafana Dashboard

From the management pane, we can also retrieve the connection strings for our PostgreSQL instance. It gives you the details for use with various languages.

Finally in settings, Compute + Storage in theory allows you to change the number of worker nodes and the configuration per node. In reality, this is read-only from within ADS, as changing any of the values and saving them has no effect. If you do want to change the config, we need to revert to the azdata CLI. Jump here to see how you do it.

In order to work with databases and tables on the newly deployed instance, we need to add our new PostgreSQL server to ADS.

From Connection strings on our PostgreSQL dashboard, make a note of the host IP address and port, we’ll need this to add our server instance.

18connstrings.png

From the Connections pane in ADS, click on Add Connection.

From the new pane enter the parameters:

Parameter Value
Connection type PostgreSQL
Server name name you gave to the instance
User name postgres
Password Password you specified for the postgreSQL deployment
Database name Default
Server group Default
Name (Optional) blank

Click on Advanced, so that you can specify the host IP address and port

Enter the Host IP Address previously noted, and set the port (default is 5432)

20.newConnectionpng.png

Click on OK and then Connect. If all is well, you should see the new connection.

Scaling Your Instance

As mentioned before, if you want to be modify the running configuration of your instance, you’ll have to use the azdata CLI.

First, make sure you are connected and logged in to your data controller.

azdata login --endpoint https://<your dc IP>:30080


Enter the data controller admin username and password

To list the postgreSQL servers that are deployed, run the following command:

azdata arc postgres server list

To show the configuration of the server:

azdata arc postgres server show -n postgres01
24.azdata.png

Digging through the JSON, we can see that the only resources requested is memory. By default, each node will use 0.25 cores.

I’m going to show how to increase the memory and cores requested. For this example, I want to set 1 core and 512Mb

azdata arc postgres server edit -n postgres01 --cores-request 1 --memory-request 512Mi
26.azdata.png

If we show the config for our server again, we can see it has been updated successfully

27.azdata.png

You can also increase the number of workers using the following example

azdata arc postgres server edit -n postgres01 --workers 4

Note: With the preview, reducing the number of workers is not supported.

If you do make any changes via azdata, you will need to close existing management panes for the instance and refresh the data controller instance within ADS for them to be reflected.

29.refresh.png

Currently, there does not appear to be a method to increase the allocated storage via ADS or the CLI, so make sure you provision your storage sizes sufficiently at deployment time.

You can deploy more than one PostgreSQL server group to you data controller, the only thing you will need to change is the name and the port used

34.multiple.png

You can use this command to show a friendly table of the port that the server is using:

azdata arc postgres server show -n postgres02 --query "{Server:metadata.name, Port:spec.service.port}" --output table

In the next post, I’ll describe how to upload logs and metrics to Azure for your on-prem instances.