This blog post is a walkthrough for building out an image server for MAAS to create custom images. For this first image, we will build a Windows 2022 server Image.
MAAS | Metal as a Service does include built-in features that support adding Linux images, you do need to build your own Windows images for use with MAAS. I used to create and script this process to make it easier. For this image builder, I am using a Dell R630 physical host with windows 2019 installed. The code base I am leveraging can be found here cloudbase/windows-imaging-tools: Tools to automate the creation of a Windows image for OpenStack, supporting KVM, Hyper-V, ESXi and more. (github.com).
There is a follow up article for creating an Azure Stack HCI image Creating an Azure Stack HCI Image for MAAS — Crying Cloud
# Enable Remote Desktop
# Manually disabled IE Enhanced security
# Install Windows Updates
# Install Windows Assessment
# Install Deployment Kit (ADK) https://learn.microsoft.com/en-us/windows-hardware/get-started/adk-install

# Run as Admin

# set execution policy bypass
Set-ExecutionPolicy -ExecutionPolicy bypass -Force:$true

# install chocolatey
Set-ExecutionPolicy Bypass -Scope Process -Force; [System.Net.ServicePointManager]::SecurityProtocol = [System.Net.ServicePointManager]::SecurityProtocol -bor 3072; iex ((New-Object System.Net.WebClient).DownloadString('https://chocolatey.org/install.ps1'))

# Useful Choco installs (you may need to relaunch Powershell)
choco install vscode -y
choco install git -y
choco install microsoft-edge -y
choco install chrome-remote-desktop-chrome -y
choco install beyondcompare -y
choco install putty.install -y
choco install winscp -y

# Install Hyber-V and management tool
Install-WindowsFeature -Name Hyper-V -IncludeManagementTools -Restart

# Reboot Server

# Create an external virtual switch called External
$adapter = Get-NetAdapter | ?{$_.status -eq "up"} | select -first 1
new-vmswitch "External" -NetAdapterName $adapter.name
Next is to get the files local so we can use them to build our images
mkdir BuilderFiles
cd builderfiles
mkdir ISOs
mkdir ISOCopy
mkdir Scripts
# Clone Repo
git clone https://github.com/cloudbase/windows-openstack-imaging-tools.git
git submodule update --init
# Load Modules
pushd windows-openstack-imaging-tools
Import-Module .\WinImageBuilder.psm1
Import-Module .\Config.psm1
Import-Module .\UnattendResources\ini.psm1
# Create a empty config.ini file
$ConfigFilePath = ".\config.ini"
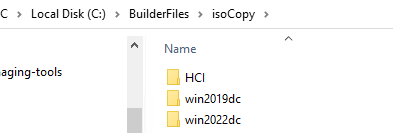
New-WindowsImageConfig -ConfigFilePath $ConfigFilePathI have saved 3 ISO files to c:\BuilderFiles\ISOs

Additionally, if you want to customize using the deployment tool kit you will need to extract the ISOs to C:\BuilderFiles\isoCopy. This way you can use “Windows System Image Manager” to build custom unattend files.
We are going to start with building a Windows 2022 Image. I am starting with 2022 as there are fewer updates to execute so it’s faster to test the process. First, mount the Windows 2022 ISO.
Copy the config.ini file we just created and rename it to config-Server-2022-UEFI.ini. We do need to make a few changes. You can explore the differences here in the compressed contents of the file. Any value not listed is =““
# C:\BuilderFiles\Scripts\config-Server-2022-UEFI.ini

[DEFAULT]
wim_file_path=F:\Sources\install.wim
image_name="Windows Server 2022 SERVERDATACENTER"
image_path=C:\BuilderFiles\Images\WinSvr2022DC.tgz
virtual_disk_format=RAW
image_type=MAAS
disk_layout=UEFI
product_key="ASDFG-GHJKL-WERTY-WERTY-ASDFG"
force=False
install_maas_hooks=True
compression_format="tar.gz"
gold_image=False
custom_scripts_path="C:\BuilderFiles\Scripts\2022CS"
enable_administrator_account=True
shrink_image_to_minimum_size=True
enable_custom_wallpaper=False
disable_first_logon_animation=False
compress_qcow2=False
zero_unused_volume_sectors=False
extra_packages_ignore_errors=False
enable_shutdown_without_logon=False
enable_ping_requests=False
enable_ipv6_eui64=False
enable_active_mode=False
[vm]
administrator_password=getBENT123!
external_switch=external
cpu_count=4
ram_size=12884901888
disk_size=42949672960
disable_secure_boot=True
[drivers]
[custom]
install_qemu_ga=False
[updates]
install_updates=True
purge_updates=True
clean_updates_offline=True
clean_updates_online=True
[sysprep]
run_sysprep=True
unattend_xml_path=UnattendTemplate2022.xml
disable_swap=True
persist_drivers_install=True
[cloudbase_init]
beta_release=False
serial_logging_port=COM1
cloudbase_init_use_local_system=False
cloudbase_init_delayed_start=False
While building and testing your images I would suggest disabling updates, for faster testing cycles, including install, purge, and clean turning these settings in the ini to false.
[updates]
install_updates=False
purge_updates=False
clean_updates_offline=False
clean_updates_online=False
We added a reference for an UnattendTemplate2022.xml file. Copy UnattendTemplate.xml from git repo to c:\builderFiles\Scripts and rename the file. Using the files in isoCopy you can edit the unattend.xml. There are lots of internet sources to assist with that process.
Here are a few small changes you can make
# DELETE Lines

<VisualEffects>
    <FontSmoothing>ClearType</FontSmoothing>
</VisualEffects>

<NetworkLocation>Work</NetworkLocation>

# ADD/EDIT Lines

<AdministratorPassword>
    <Value>getBENT123!</Value>
    <PlainText>true</PlainText>
</AdministratorPassword>
<!-- The following is needed on a client OS -->
<LocalAccounts>
    <LocalAccount wcm:action="add">
        <Password>
            <Value>getBENT123!</Value>
            <PlainText>true</PlainText>
        </Password>
        <Description>Admin user</Description>
        <DisplayName>Admin</DisplayName>
        <Group>Administrators</Group>
        <Name>Admin</Name>
    </LocalAccount>
</LocalAccounts>

# Microsoft-Windows-TerminalServices-RDP-WinStationExtensions
<UserAuthentication>0</UserAuthentication>
Another way you can configure the images is with Custom Scripts in the CustomScripts folder. I find this easier than working through windows Image settings. Some files you can use are RunAfterCloudbaseInitInstall.ps1, RunBeforeWindowsUpdates.ps1, RunBeforeCloudbaseInitInstall.ps1, RunAfterWindowsUpdates.ps1.
Here is a file I have created C:\BuilderFiles\Scripts\2022CS\RunBeforeSysprep.ps1 and the parameter is already set in the ini custom_scripts_path="C:\BuilderFiles\Scripts\2022CS\"
# C:\BuilderFiles\Scripts\2022CS\RunBeforeSysprep.ps1
function Write-Log {
    Param($messageToOut)
    add-content -path "c:\build.log" ("{0} - {1}" -f @((Get-Date), $messageToOut))
}

function Disable-IEESC {
    $AdminKey = "HKLM:\SOFTWARE\Microsoft\Active Setup\Installed Components\{A509B1A7-37EF-4b3f-8CFC-4F3A74704073}"
    $UserKey = "HKLM:\SOFTWARE\Microsoft\Active Setup\Installed Components\{A509B1A8-37EF-4b3f-8CFC-4F3A74704073}"
    Set-ItemProperty -Path $AdminKey -Name "IsInstalled" -Value 0
    Set-ItemProperty -Path $UserKey -Name "IsInstalled" -Value 0
    Stop-Process -Name Explorer
    Write-Host "IE Enhanced Security Configuration (ESC) has been disabled." -ForegroundColor Green
}

Write-Log "RunBeforeSysprep.ps1 starting"

write-Log "Disable-IEESC"
Disable-IEESC

write-Log "Allow RDP"
Set-ItemProperty -Path 'HKLM:\System\CurrentControlSet\Control\Terminal Server' -name 'fDenyTSConnections' -value 0
Enable-NetFirewallRule -DisplayGroup 'Remote Desktop'

write-Log  "Allow All RDP clients"
(Get-WmiObject -class 'Win32_TSGeneralSetting' -Namespace root\cimv2\terminalservices -ComputerName $env:COMPUTERNAME -Filter 'TerminalName="RDP-tcp"').SetUserAuthenticationRequired(0)

write-Log  "set updates"
Set-ItemProperty -Path "HKLM:\SOFTWARE\Policies\Microsoft\Windows\WindowsUpdate\AU" -Name AUOptions -Value 4

write-Log "avahcAdmin"
$Password = ConvertTo-SecureString -String "getBENT123!" -AsPlainText -Force
New-LocalUser -Name "avahcAdmin" -Password $Password -AccountNeverExpires
Add-LocalGroupMember -Group "Administrators" -Member "avahcAdmin"
& cmd.exe /c 'net.exe user "avahcAdmin" "getBENT123!"'

write-Log "avaAdmin"
$Password = ConvertTo-SecureString -String "getBENT123!" -AsPlainText -Force
New-LocalUser -Name "avaAdmin" -Password $Password -AccountNeverExpires
Add-LocalGroupMember -Group "Administrators" -Member "avaAdmin"
& cmd.exe /c 'net.exe user "avaAdmin" "getBENT123!"'

write-Log "disable administrator"
& cmd.exe /c 'net.exe user Administrator /active:no'

write-Log "disable admin"
& cmd.exe /c 'net.exe user Admin /active:no'
#& cmd.exe /c 'net.exe user "Administrator" "getBENT123!"'

Write-Log "RunBeforeSysprep.ps1 Finished"
Next, create a file called Build-2022.ps1.
# C:\BuilderFiles\Scripts\Build-2022.ps1
Param (
    $VerbosePreference = "Continue",
    $ISOImage = "C:\BuilderFiles\isos\en-us_windows_server_2022_updated_april_2022_x64_dvd_d428acee.iso",
    $ConfigFilePath = "C:\BuilderFiles\Scripts\config-Server-2022-UEFI.ini",
    $CloudBuildModules = "C:\BuilderFiles\windows-openstack-imaging-tools"
)
Set-Location $CloudBuildModules

Import-Module .\WinImageBuilder.psm1
Import-Module .\Config.psm1
Import-Module .\UnattendResources\ini.psm1

Mount-DiskImage -ImagePath $ISOImage
$MountLetter = (Get-DiskImage $ISOImage| Get-Volume).DriveLetter

# Create a config.ini file using the built in function, then set them accordingly to your needs
# New-WindowsImageConfig -ConfigFilePath $ConfigFilePath
# To automate the config options setting:
Set-IniFileValue -Path (Resolve-Path $ConfigFilePath) -Section "DEFAULT" -Key "wim_file_path" -Value ("$MountLetter" + ":\Sources\install.wim")

#New Online image
New-WindowsOnlineImage -ConfigFilePath $ConfigFilePath

Dismount-DiskImage $ISOImage
Execute this script, which will use DISM to create the initial image

Which will then be booted by Hyper-V and any scripts specified executed locally

This shows the custom script log c:\build.log has completed and sysprep running
Once this is complete because we are loading this to MAAS the image will be compressed and converted to a RAW image and then tarballed and gzipped.
Using Putty create a session to one of the servers you manage MAAS

you can also import this into winSCP and copy the image file up to the ubuntu server directory. My goal was to automate this but didn’t manage to get the process fully end-to-end, so this part is still manual.
Then we can log into that server and upload the boot image. To keep track of files and images I add an instance numbering to the name.
# Must have the MAAS CLI installed
# Must have a MAAS profile (in this case mquick)

maas mquick boot-resources create name='windows/WS2022DC01' title='WinServer2022DC01' architecture='amd64/generic' filetype='ddtgz' content@=WinSvr2022DC01.tgz

# Additional Boot-resource management commands
# Show all
maas mquick boot-resources read
# delete one
maas mquick boot-resource delete id
maas mquick boot-resource delete 80Now for the final test, deploying the newly created image using MAAS
After MAAS finishes the deployment, we can log in using the pre-staged Admin accounts and the other settings we configured, RDP, etc

You can mix and match depending on your needs. Here is a follow-on article of how to create an image for Azure Stack HCI Creating an Azure Stack HCI Image for MAAS — Crying Cloud
If you are new to MAAS or having issues with custom windows images hopefully this is helpful.